
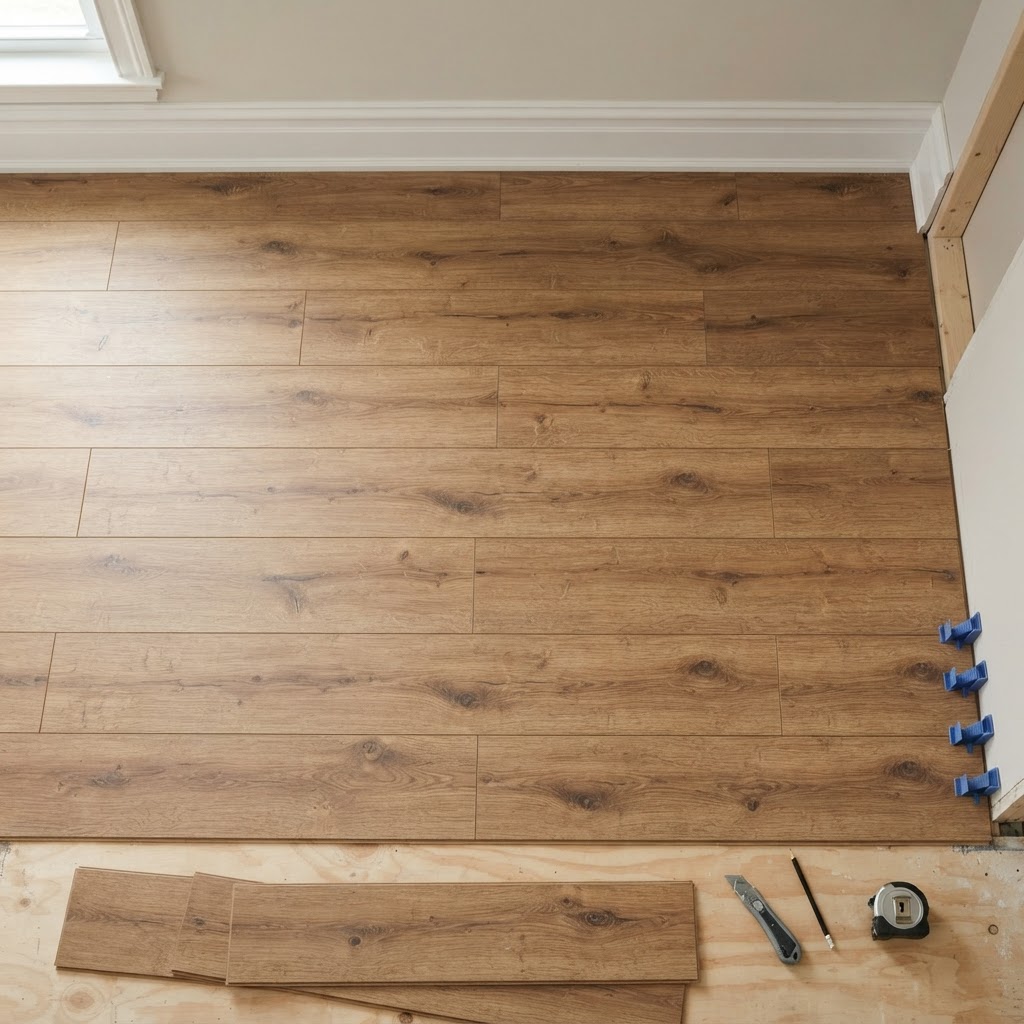
When a luxury vinyl plank floor looks wrong, the problem often is not the product. It is the layout. Seams that line up across rows, repeating stair-step patterns, short scraps scattered everywhere, and identical planks sitting side by side all make a floor look artificial, even when the planks themselves are a convincing wood look. And beyond appearance, poor staggering can weaken a floating floor and make it more likely to separate.
Staggering is the practice of offsetting the end joints, where one plank meets the next in the same row, so that they do not line up with the end joints in neighboring rows. It sounds simple, and in principle it is. But doing it well, so the floor looks like real hardwood and performs as designed, takes planning.
This guide explains why staggering matters, the general rules for spacing end joints, the patterns to avoid, how to plan a layout, and the details that separate a professional installation from an amateur one.
Why Staggering Matters
Staggering serves two purposes: strength and appearance.
Strength. Most rigid core LVP in Northern Virginia homes is installed as a floating floor. The planks are not attached to the subfloor. They are held together by their click-lock joints, and the floor moves slightly as a single unit with changes in temperature. When end joints are well staggered, the forces on the floor are spread across many interlocking planks. When end joints line up across rows, they create a continuous weak line through the floor. Over time, that line is more likely to separate, flex, or develop gaps, especially in rooms with temperature swings such as sunrooms, rooms with large windows, and basements.
Appearance. Real hardwood floors are made of boards of varying lengths laid in a random pattern. Our eyes are used to that randomness. When LVP seams line up or form an obvious repeat, the floor immediately reads as artificial. A well-staggered LVP floor looks like a natural wood floor.
Manufacturer requirements. Most LVP manufacturers specify a minimum end joint offset in their installation instructions. Following that requirement is not optional if you want the floor to perform as designed and to keep the manufacturer's warranty intact. Always read the instructions for the specific product being installed.
The General Rule for End Joint Spacing
Every product is a little different, so the manufacturer's instructions always come first. As a general guideline, many manufacturers call for end joints in adjacent rows to be offset by at least six to eight inches, and many professional installers aim for more where possible.
Beyond that minimum, good practice includes these principles.
Vary the offsets. Do not use the same offset on every row. Varying the distance between end joints from row to row creates a more random, natural look.
Avoid end joints lining up every other row. A common mistake is getting the minimum offset between adjacent rows while letting joints in row one and row three line up perfectly. That creates a visible pattern. Watch joints at least two or three rows apart, not just the row next door.
Use enough full-length and long planks. A floor with mostly long planks and a few shorter pieces looks more natural than one full of short scraps.
Respect a minimum plank length. Many manufacturers specify a minimum length for cut pieces, especially at the start and end of rows. Very short pieces are weak, harder to lock in, and look choppy.
Patterns to Avoid
These are the layouts that make LVP look fake or weaken the floor.
The stair-step pattern. If each row starts with a piece that is a fixed amount shorter than the row before, the end joints form a diagonal staircase across the floor. It is one of the most common mistakes in DIY installations and is instantly noticeable from across the room.
The H-joint. An H pattern forms when end joints in two rows that are one row apart line up, with a single plank in between. The joints look like the letter H. It is visually distracting and creates a weak point.
The brick or ladder pattern. When end joints fall at the same point every other row, the floor looks like brickwork. That is fine for subway tile, not for a floor meant to look like wood.
Clustered short pieces. Several short pieces in a small area look patchy, especially in a high-visibility spot such as an entry or the middle of a living room.
Repeating identical planks. LVP is printed with a limited number of different plank images. If identical planks end up next to each other, or the same distinctive knot or grain feature appears over and over in a small area, the floor looks printed. Shuffling planks from several boxes before installing prevents this.
How to Plan a Staggered Layout
Good staggering starts before the first plank goes down.
Open and mix several boxes. Pull planks from at least three or four boxes and work from all of them. This mixes the different printed designs and any slight variations in color between batches.
Lay out a dry run. Before clicking planks together, lay out a few rows loosely to see how the patterns and joints look. Rearrange any planks that put identical designs together or create obvious patterns.
Decide where the floor starts. Most installations start along a long, straight exterior wall. Measure the room to make sure the last row will not be a narrow sliver. If it would be, adjust the width of the first row so the first and last rows are roughly balanced.
Use the cut-off from one row to start the next, when it works. A common professional technique is to use the piece cut off at the end of one row to start the next row, as long as it meets the minimum length and does not create a pattern. This reduces waste and naturally varies the starting lengths. But do not apply it blindly. If it creates a stair step or lines up joints, choose a different piece.
Keep checking as you go. Every few rows, step back and look at the floor from different angles, especially from doorways and the main viewing points in the room. It is much easier to fix a pattern a few rows in than after the room is finished.
Special Situations
Hallways and long runs. Long hallways with planks running lengthwise put the end joints on display. Use longer planks and generous, varied offsets here.
Open floor plans. In open-concept homes common in Ashburn, Brambleton, and South Riding, LVP often runs continuously through the kitchen, dining, and family rooms. A floating floor across a large area may require expansion breaks at certain distances or at doorways, depending on the manufacturer. Staggering must be maintained across the entire area so it looks like one natural floor.
Basements. LVP is extremely popular in Northern Virginia basements. Basements often have columns, stairs, and walls that are not perfectly square, all of which affect layout. Plan around these features so cuts and joints do not cluster in visible spots near the stairs.
Around cabinets and islands. When LVP runs around a kitchen island, maintaining a consistent stagger on both sides requires careful planning so the rows line back up correctly on the far side.
Stairs. LVP on stairs is installed tread by tread with stair nosings, and staggering is less of a concern. Matching the plank designs on treads to the floor, however, still matters for appearance.
Installation Details That Make a Difference
Staggering works together with the rest of a proper installation.
Acclimation. Many manufacturers require LVP to acclimate in the room before installation. Follow those instructions, especially with Northern Virginia's seasonal humidity swings.
Subfloor flatness. A floating floor needs a flat subfloor. High and low spots put stress on the joints, and that stress concentrates where joints line up. Good staggering cannot compensate for an uneven subfloor.
Expansion gaps. Floating floors need a gap at the walls and around fixed objects to allow for movement. The gap is covered by baseboard or quarter round. Pinning a floating floor by installing it tightly against walls, or by fastening cabinets or heavy fixtures through it, can cause buckling and joint separation.
Fully engaged joints. Each click joint must be fully locked. Partially engaged joints can look fine at first and separate later.
Why Professional Installation Pays Off
Staggering is a skill that improves with experience. A professional installer makes layout decisions constantly, choosing planks, balancing row widths, avoiding patterns, and planning cuts around doorways, vents, and cabinets, often without consciously thinking about it. The result is a floor that looks natural and holds together for years.
DIY installations, by contrast, often show patterns that the homeowner did not notice until the room was finished and the furniture was back. Undoing a layout means taking up planks, and sometimes those planks cannot be reused if their joints are damaged.
Which Direction Should LVP Planks Run
Staggering and plank direction go hand in hand. The direction you choose determines which seams are most visible and how the stagger reads across the room.
Running planks parallel to the longest wall is the most common approach. It makes rooms look longer and usually requires fewer cuts.
Running planks toward the main source of natural light, such as a large window or sliding door, helps hide the seams, because light travels along the planks rather than across the joints.
In homes with several connected rooms, keeping the planks running in one consistent direction throughout creates flow. Changing direction from room to room usually requires a transition strip and can make spaces feel chopped up.
In narrow hallways, running planks lengthwise down the hall almost always looks best.
Once the direction is chosen, the stagger is planned along that direction, and the first row sets the pattern for everything that follows.
Fixing a Floor That Was Staggered Poorly
If your existing LVP floor shows a stair-step pattern, an H-joint, or obvious repeating planks, the fix depends on how bad it is and where it is.
For a floating floor, an installer can take up rows from the nearest wall back to the problem area and relay them with a better stagger, using new planks where needed to break up the pattern.
For a small number of identical planks sitting side by side, individual planks can sometimes be swapped with planks from closets or from your spare box.
For joints that are separating because they line up, relaying is usually necessary, and it is worth checking subfloor flatness at the same time, because separation often has more than one cause.
Frequently Asked Questions
Is there an ideal stagger distance? The manufacturer's minimum is the starting point. Beyond that, the goal is randomness rather than a single ideal number. Varied offsets with no visible pattern look best.
Should end joints ever line up? In a standard plank floor, no. Some decorative patterns, such as herringbone, chevron, or an intentional straight-lay design, follow different rules, but they use products and layouts designed for those patterns.
Does staggering waste more material? Good staggering often reduces waste, because cut-offs from the end of one row can begin the next. Most installations include a waste allowance for cuts around walls, doorways, and obstacles regardless.
Can Floors and Beyond VA install LVP in a herringbone pattern? Yes, when the product is designed for it. Herringbone LVP uses specific left and right planks and its own layout rules.
A Walkthrough of a Typical Layout
To make the principles concrete, here is how an experienced installer might approach a typical Northern Virginia family room with a long exterior wall and a sliding door to the deck.
First, the installer measures the room's width across the planned plank direction and divides by the plank width to see how wide the last row will be. If the last row would be a narrow strip, the first row is ripped narrower so both edges of the room end up with reasonably sized rows.
Next, the installer opens several boxes and sorts planks loosely, setting aside any with distinctive features that should be spread out across the room.
The first row starts with a full plank along the straight exterior wall, with spacers maintaining the expansion gap. The last plank in the row is cut to fit, and the cut-off, if it meets the minimum length, becomes a candidate to start row two.
For row two, the installer checks that its first end joint will fall well away from row one's joints. If the cut-off would create a near alignment, a different plank or a fresh cut is used instead.
By row three, the installer is watching joints two rows back as well as one, avoiding H-joints and stair steps.
Every few rows, the installer stands at the doorway and at the sliding door, the two places people will view the room from most, and checks the pattern. Planks with identical prints are swapped out of side-by-side positions.
Near the sliding door, the installer plans so a full or long plank runs along the threshold, avoiding a cluster of short pieces in the most visible spot.
The result is a floor where the eye sees long runs of wood grain, varied seams, and no repeating geometry. In other words, it looks like real wood.
Why Rushed Installations Show Patterns
Many layout problems come from speed. When an installer is paid by the square foot and moving fast, the easiest approach is to use whatever cut-off is in hand and keep going. That is how stair-step and brick patterns appear. Taking time to choose planks deliberately adds little to the overall project but makes a large difference to how the floor looks for its entire life.
How Floors and Beyond VA Installs LVP
Floors and Beyond VA has been installing flooring across Northern Virginia since 1987. Our LVP installers are our own employees, never subcontractors, and they bring years of experience to every layout. We mix planks from multiple boxes, plan row widths and starting points before installation, follow each manufacturer's end joint requirements, and check the floor from every angle as we go. We also prepare the subfloor to the flatness the product requires, maintain proper expansion gaps, and finish with trim that ties the room together.
Whether you are installing LVP in a basement, a kitchen, or throughout an open main level, we will make sure your floor looks like a natural wood floor and performs the way it should. Book a free in-home estimate with Floors and Beyond VA at floorsandbeyondva.com/Contact to talk through your project.
Quick Reference for Staggering LVP
Follow the manufacturer's minimum end joint offset, commonly at least six to eight inches.
Vary the offsets from row to row.
Watch joints two and three rows apart, not just adjacent rows.
Avoid stair-step, H-joint, and brick patterns.
Respect minimum plank lengths and avoid clusters of short pieces.
Mix planks from several boxes so identical designs do not sit together.
Dry lay a few rows and step back often to check the pattern.
Start from a straight wall and balance the first and last row widths.

