
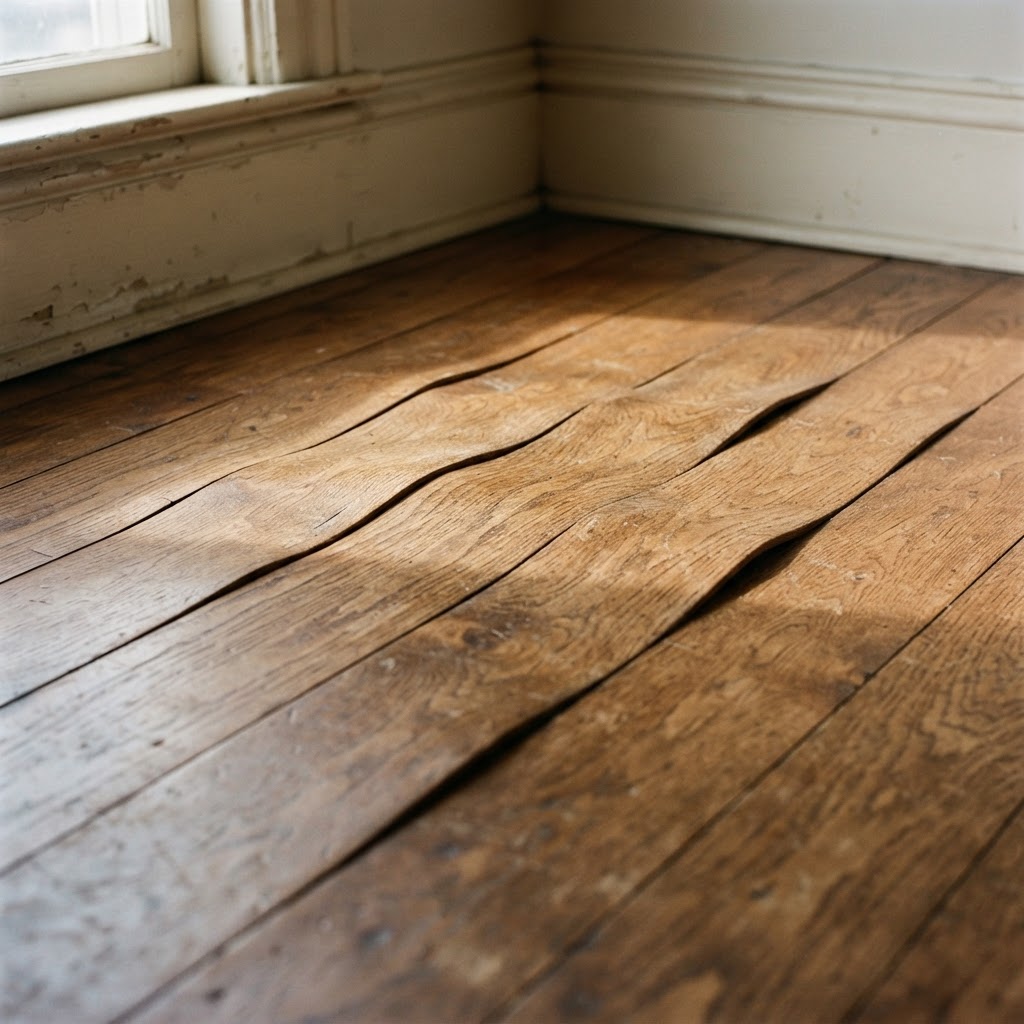
You notice it first with your bare feet. The boards in the kitchen or the family room no longer feel flat. Run your hand across the floor and you can feel a gentle ridge at every seam, with each board dipping slightly in the middle. Look down the length of the room with a flashlight held low and the floor seems to ripple like corrugated metal. That is cupping, and it is one of the most common hardwood complaints we hear from homeowners across Fairfax, Loudoun, Prince William, and Arlington counties.
Cupping is unsettling because it looks like the floor is failing. In most cases it is not. Cupping is the wood telling you something about moisture, and if you listen to it and fix the cause in the right order, the floor can usually be saved. If you rush the repair, though, you can turn a fixable problem into a permanent one. This guide explains what cupping is, why Northern Virginia homes are especially prone to it, how to tell whether your floor is still moving, and how a professional cupped hardwood floor repair actually works.
What Cupping Actually Is
A solid hardwood board is not a static object. It is a slice of a tree that still absorbs and releases moisture from the air and from whatever is beneath it. When wood takes on moisture, it swells across its width far more than it swells along its length. When it dries, it shrinks across its width again.
Cupping happens when the bottom of a board takes on more moisture than the top. The underside swells, the top stays drier and narrower, and the board bends so that its edges rise higher than its center. Picture a board trying to curl into a shallow trough. Because every board in the floor is doing the same thing at the same time, the whole surface takes on that washboard look.
Cupping has a close cousin called crowning, which is the reverse shape. A crowned board is higher in the middle than at its edges. Crowning is very often the result of a cupped floor that was sanded flat before it had dried out. Once the moisture finally left the bottom of the boards, they relaxed, and the edges that had been sanded off dropped below the center. That sequence is the single biggest reason we tell homeowners not to rush a cupped hardwood floor repair.
Cupping is also different from buckling. Buckling is when boards lift completely off the subfloor, sometimes several inches, usually after a flood or a major leak. Buckling is an emergency. Cupping is a warning.
Why Northern Virginia Floors Cup
Northern Virginia has a climate that is hard on wood. Summers are long, hot, and humid, and the humidity often stays high well into September. Winters are cold enough that forced-air heating runs for months and pulls the indoor air very dry. A hardwood floor in a NoVA home lives through a big seasonal swing every single year.
On top of the climate, the region's housing stock creates specific moisture paths that lead to cupping. In our work across the area, these are the causes we find most often.
Damp crawl spaces and basements. Many older homes in Arlington, Falls Church, Vienna, and Alexandria sit over crawl spaces that were never properly vented or sealed. Moist air from below rises into the subfloor and into the underside of the hardwood. The top of the floor is exposed to drier indoor air, so the bottom swells and the boards cup. This is the classic pattern in pre-war and mid-century homes.
Slab moisture. In newer construction across Loudoun and Prince William, hardwood is sometimes installed over a concrete slab, often as engineered flooring. Concrete holds and transmits moisture. If the vapor barrier between the slab and the floor was skipped, damaged, or installed incorrectly, moisture vapor works its way up into the wood.
Plumbing leaks. A slow leak from a dishwasher supply line, a refrigerator ice maker, a toilet wax ring, or a pipe in the wall can soak into the subfloor for weeks before anyone notices. The cupping is often localized to the area around the leak, which is a useful clue.
Wet mopping and spills. A floor that is mopped with a lot of water, or a spill that sits overnight, can push moisture down through the seams. This usually causes cupping near entryways, sinks, and pet water bowls.
Humidity swings and no climate control. A home that is closed up for a summer without air conditioning, or a vacation home that sits empty, can let the indoor humidity climb high enough to cup an entire floor.
Installation problems. Wood that was installed before it acclimated to the home, a missing expansion gap at the walls, or flooring that went down over a subfloor with high moisture content can all lead to cupping weeks or months later.
How to Tell Whether Your Floor Is Still Moving
Before anyone sands, refinishes, or replaces a cupped floor, the most important question is whether the moisture problem is active, resolved, or seasonal. The answer decides the entire repair plan.
A professional assessment starts with moisture readings. A pin or pinless moisture meter measures the moisture content of the hardwood itself, and readings taken at the center of boards and near the seams tell us how much the wood is holding. We compare those readings with boards in a dry, unaffected room of the same house, and with what is normal for the wood species. We also take readings of the subfloor from below when there is access through a basement or crawl space. Relative humidity readings in the room and below the floor round out the picture.
Then we look for the source. We check the crawl space or basement for standing water, condensation on ductwork, missing vapor barriers, and wet insulation. We look around appliances, under sinks, and along exterior walls. We look at gutters and downspouts, because a downspout that dumps water against the foundation is a surprisingly common cause of cupping in the room on the other side of that wall. On slab homes, we may test the concrete.
The pattern of the cupping also tells a story. Cupping across an entire floor points to a whole-house humidity or crawl space issue. Cupping in one area, especially one that is worse closer to a wall, a sink, or an appliance, points to a localized water source. Cupping that appears every summer and flattens out every winter is seasonal, and it is telling you the home's humidity control needs work.
Why Sanding a Cupped Floor Too Soon Is a Mistake
The instinct when you see a cupped floor is to sand it flat and refinish it. It looks like the obvious fix, and some contractors will happily do it right away. It is usually the wrong move.
If you sand a cupped floor while the boards are still holding extra moisture, the sander removes the raised edges and leaves the floor looking flat for the moment. Then, over the following weeks and months, the moisture leaves the bottom of the boards. The boards relax back toward flat. But the edges are now thinner than the centers, because you sanded them down. The floor ends up crowned, and crowning cannot be fixed by waiting. You have removed wood you cannot put back, and you have used up part of the floor's wear layer in the process.
That is why a good cupped hardwood floor repair always follows the same order. First, stop the water. Second, let the floor dry. Third, reassess. Only then do we decide whether sanding, partial replacement, or full replacement is needed.
The Repair Process, Step by Step
Here is how Floors and Beyond VA approaches cupped hardwood floor repair in a typical Northern Virginia home.
Step one is finding and fixing the source. This may mean repairing a plumbing leak, regrading soil away from the foundation, extending downspouts, adding or repairing a vapor barrier in the crawl space, sealing crawl space vents, adding a dehumidifier in the basement or crawl space, or addressing a slab moisture problem. Sometimes the fix is as simple as running the air conditioning consistently through the summer and keeping a whole-home humidifier balanced in the winter. The floor cannot be repaired until the cause is under control, so this step is not optional.
Step two is drying. Once the source is stopped, the floor needs time and the right conditions to give up the moisture. Dehumidification and steady air conditioning help. In more serious cases, a drying system may be set up to pull moisture out of the subfloor and the wood. Drying is not a fixed number of days. It is done when the moisture readings in the affected area come back in line with the readings in a dry, healthy part of the house.
Step three is monitoring. We take readings again over time to confirm the floor has stabilized. Many cupped floors flatten out on their own during this phase, either completely or most of the way. That is the best outcome, because a floor that relaxes back to flat may need nothing more than a cleaning or a light screen and recoat.
Step four is the repair decision. Once the floor is dry and stable, we look at what is left.
If the floor has returned to flat or nearly flat, it may only need a maintenance coat, or nothing at all.
If minor cupping remains after the wood has fully dried, the floor can be sanded flat and refinished. At this point sanding is safe, because the boards are not going to move back. Sanding a dry, stable floor removes the remaining ridges and leaves a smooth surface, and a fresh finish protects it.
If some boards are cracked, split, stained black from long water exposure, or simply too deformed to recover, those boards can be cut out and replaced with matching wood, woven into the existing floor so the repair does not stand out. The repaired area is then sanded and finished along with the rest of the room so the color and sheen match.
If the damage is widespread, the subfloor is compromised, or the wood has delaminated, as can happen with engineered flooring that has been wet for a long time, replacement may be the honest answer. We will tell you when that is the case, and we will also tell you when it is not.
Solid Hardwood Versus Engineered Hardwood
The type of floor affects the repair. Solid hardwood, the kind found in most older Northern Virginia homes, has a thick wear layer and can usually be sanded several times over its life. That gives you room to sand out residual cupping once the floor is dry.
Engineered hardwood has a real wood top layer bonded to a plywood or composite core. Engineered floors are more dimensionally stable than solid wood and are less prone to cupping in the first place, which is one reason they are common over concrete slabs. But when an engineered floor does cup badly, the thinner wear layer may limit how much sanding it can take, and prolonged moisture can cause the layers to separate. With engineered flooring, the moisture assessment and the wear layer measurement are both critical before deciding on a repair.
What You Can Do Right Now
If you have just noticed cupping, there are a few sensible steps to take while you arrange an assessment.
Look for an obvious water source. Check under the kitchen sink, behind the refrigerator, around the dishwasher, near any bathroom on the same level, and along exterior walls. If you find a leak, shut off the water to that fixture and have it repaired.
Take a look below the floor if you can. If you have a basement or crawl space under the affected room, check for standing water, damp insulation, condensation, or a musty smell.
Run the air conditioning or a dehumidifier. Lowering indoor humidity helps the floor begin to dry. Avoid blasting heat or fans directly on the floor to speed things up. Drying too fast can crack the boards.
Stop wet mopping. Use a dry or barely damp microfiber mop until the problem is solved.
Do not sand, and do not refinish. Resist the urge, and be cautious of anyone who wants to sand a cupped floor on the first visit without measuring moisture.
Take photos. Pictures with a straightedge laid across the boards, or with a low flashlight showing the ripple, help document how the floor changes as it dries.
Preventing Cupping in the Future
Once your floor has been repaired, a few habits keep it flat.
Keep indoor relative humidity in a stable range year round. A hygrometer is inexpensive and tells you where your home stands. In Northern Virginia, that usually means running air conditioning or a dehumidifier in summer and a humidifier in winter.
Keep the space under the floor dry. A sealed crawl space, a proper vapor barrier, and good drainage around the foundation protect your floors from below.
Clean up spills promptly and clean with products made for wood floors, using a lightly damp mop rather than a wet one.
Check appliance supply lines periodically. Braided steel supply lines and leak detectors near the dishwasher and refrigerator are cheap insurance.
Make sure any new flooring is acclimated and installed with proper moisture testing and expansion gaps. A floor installed correctly from the start is far less likely to cup.
Why Homeowners Call Floors and Beyond VA for Cupped Floors
Cupped floors need patience and a diagnosis, not just a sander. Floors and Beyond VA has been working on Northern Virginia hardwood since 1987, and our approach has always been to restore first and replace only when restoration truly will not work. That philosophy matters with cupping, because many cupped floors can be fully saved if the moisture is handled correctly and the repair is done in the right order.
Our crews are our own employees, not subcontractors. The same people who assess your floor are the people who repair it, which means nothing gets lost between the diagnosis and the work. We know the local housing stock, from the red oak and heart pine in pre-war Arlington and Alexandria homes to the engineered floors over slabs in newer Loudoun communities, and we know the moisture problems each of those homes tends to have.
When we visit, we take moisture readings, look for the source, explain what we find in plain language, and lay out the repair path, including the drying and monitoring steps. If your floor can recover on its own once the water is stopped, we will tell you that. If it needs sanding, board replacement, or a larger repair, we will walk you through why.
Cupping looks alarming, but in most homes it is a solvable problem. Stop the water, let the wood dry, and then make the repair. If you are seeing that washboard ripple in your floors, book a free in-home estimate with Floors and Beyond VA at floorsandbeyondva.com/Contact and we will help you figure out exactly what your floor needs.

